
In the previous blog, we talked about what Windows containers are and how developers can start using them for modernizing their applications. In this blog, we will look at how you can deploy a Kubernetes cluster that uses Windows Server nodes as the worker nodes to run these Windows containers.
As we discussed in the previous blog, Windows Support was made generally available in Kubernetes version 1.14, so that’s the version that we will deploy in this blog post. Also, since Windows Server cannot run the control plane components for Kubernetes (K8s), we will be using an Ubuntu 16.04 VM as the K8s master VM and then join the Windows Server VMs to the cluster. All these VMs are deployed on top of ThinkAgile MX, which is Lenovo’s Azure Stack HCI solution.
So, let’s get started. We will start by deploying 1 Ubuntu 16.04 VM, you can find the link to download the ISO here.
1. Deploy the VM with at least 4 vCPUs and 8GB of RAM, and I went with 100GB of storage. Proceed with standard installation without selecting any additional packages. We will install all the required packages as part of this blog.
2. Once the VM is up and running, assign a static IP address to your VM. You can use these steps to configure a static IP on your VM.
3. Enable SSH for the Ubuntu VM:
sudo apt-get install openssh-server
4. SSH into the VM and then elevate to a root shell:
sudo su
5. Then update your VM, using:
apt-get update -y && apt-get upgrade -y
6. Next step is to install Docker on your Ubuntu VM. To do that, install packages to allow apt to use a repository over HTTPS
apt-get install \
    apt-transport-https \
    ca-certificates \
    curl \
    gnupg-agent \
    software-properties-common
7. Add Docker’s official GPG key
curl -fsSL https://download.docker.com/linux/ubuntu/gpg | sudo apt-key add -8. Verify that you now have the key with the fingerprint 9DC8 5822 9FC7 DD38 854A E2D8 8D81 803C 0EBF CD88, by searching for the last 8 characters of the fingerprint
apt-key fingerprint 0EBFCD889. Use the following command to set up the stable repository
add-apt-repository \
   "deb [arch=amd64] https://download.docker.com/linux/ubuntu \
   $(lsb_release -cs) \
   stable"
10. Update the apt package index
apt-get update -y11. We will install a specific version of the Docker CE binaries, so use the following command
apt-get install docker-ce=5:18.09.1~3-0~ubuntu-xenial docker-ce-cli=5:18.09.1~3-0~ubuntu-xenial containerd.io
12. That should install docker, so just to verify that everything worked, use the following commands
docker version
docker run hello-world
docker images
13. Now that you have Docker running on your Ubuntu VM, we will go ahead and install Kubernetes.
14. Download the kubeadm binaries using the following command. The following command installs version 1.14.7 for all the binaries, which is needed to install Kubernetes version 1.14. If you install the latest version of kubeadm, you will have the latest version of Kubernetes when you initialize your cluster
curl -s https://packages.cloud.google.com/apt/doc/apt-key.gpg | apt-key add -
cat <<EOF >/etc/apt/sources.list.d/kubernetes.list
deb http://apt.kubernetes.io/ kubernetes-xenial main
EOF
apt-get update && apt-get install -y kubeadm=1.14\* kubectl=1.14\* kubelet=1.14\* kubernetes-cni=0.7\*
15. Turn off the swap space using:
nano /etc/fstab # (remove a line referencing 'swap.img' , if it exists)
swapoff -a
16. Now, let’s initialize the master. The following command will use a 10.244.0.0/16 network as the Kubernetes cluster network and the 10.96.0.0/12 network as the Kubernetes service network. You can change these if you want for your installation, but make sure that you have large subnets as shown in the example below.
kubeadm init --pod-network-cidr=10.244.0.0/16 --service-cidr=10.96.0.0/12
Copy and save the kubeadm join command that you see at the end of the successful initialization. You will need this in the next steps.
17. To use kubectl as a regular user and not a root user, exit out of the elevated shell and use the following commands
mkdir -p $HOME/.kube
sudo cp -i /etc/kubernetes/admin.conf $HOME/.kube/config
sudo chown $(id -u):$(id -g) $HOME/.kube/config
18. If you were building a K8s cluster with just Linux VMs, you could move onto the networking setup, but since we want to use Windows VMs, we will go ahead and enable Mixed OS Scheduling.
mkdir -p kube/yaml && cd kube/yaml
kubectl get ds/kube-proxy -o go-template='{{.spec.updateStrategy.type}}{{"\n"}}' --namespace=kube-system
wget https://raw.githubusercontent.com/Microsoft/SDN/master/Kubernetes/flannel/l2bridge/manifests/node-selector-patch.yml
kubectl patch ds/kube-proxy --patch "$(cat node-selector-patch.yml)" -n=kube-system
kubectl get ds -n kube-system
19. Now we will go ahead and setup flannel in vxlan mode, to set up a virtual overlay network that uses VXLAN tunneling to route packets between K8s nodes.
sudo sysctl net.bridge.bridge-nf-call-iptables=1
wget https://raw.githubusercontent.com/coreos/flannel/master/Documentation/kube-flannel.yml
20. Edit the YAML file that you just downloaded and edit the net-conf.json and cni-conf.json sections of the file to match the following:
net-conf.json: |
{
"Network": "10.244.0.0/16",
"Backend": {
"Type": "vxlan",
"VNI" : 4096,
"Port": 4789
}
}
cni-conf.json: |
{
"name": "vxlan0",
"plugins": [
{
"type": "flannel",
"delegate": {
"hairpinMode": true,
"isDefaultGateway": true
}
},
{
"type": "portmap",
"capabilities": {
"portMappings": true
}
}
]
}
21. Launch Flannel and update the DaemonSet, so that flannel pods are only scheduled on the Linux nodes.
kubectl apply -f kube-flannel.yml
kubectl patch ds/kube-flannel-ds-amd64 --patch "$(cat node-selector-patch.yml)" -n=kube-system
22. Run a few verification commands to ensure everything is in running state, once everything looks good, we can move onto the Windows VMs.
kubectl get ds -n kube-system
kubectl get pods --all-namespaces
kubectl get nodes
Now that the Ubuntu Master VM is ready, we will deploy 3 additional Windows VMs running Server 2019, with 4 vCPUs and 8GBs of RAM and 100GBs of storage. Once the VMs are ready, install all Windows Updates, assign Static IP addresses and then change their hostnames.
23. Once all the pre-req work is done, we will begin by installing Docker on our Windows VMs. Run Powershell ISE as an Administrator and use the following commands
Install-Module -Name DockerMsftProvider -Repository PSGallery -Force
Install-Package -Name Docker -ProviderName DockerMsftProvider
Restart-Computer -Force
24. Once the VM is rebooted, the docker service should start automatically and you should be able to use the following command to verify
docker version
But, if that gives and error, use the following command to start the docker service
Start-Service docker
25. Download the pause infrastructure docker image, tag it and run it to ensure everything looks good.
docker pull mcr.microsoft.com/windows/nanoserver:1809
docker tag mcr.microsoft.com/windows/nanoserver:1809 microsoft/nanoserver:latest
docker run microsoft/nanoserver:latest
26. Now that Docker is installed and running, we will go ahead and install Kubernetes on these Windows VMs. Start by creating a new directory.
mkdir c:\k
27. Copy the config file from the Ubuntu VM located at $HOME/.kube/config and copy it into the new directory (c:\k). I used WinSCP to download it from the Ubuntu VM and then copy it into all the Windows VMs.
28. Download the Kubernetes 1.14 binaries from this link. Extract the binaries and place the kubectl, kubelet and kube-proxy binaries into the C:\k directory.
29. Next, use the following commands to update your environment variable so you can use the kubectl command from anywhere using the config that you copied earlier.
$env:Path += ";C:\k"
[Environment]::SetEnvironmentVariable("Path", $env:Path + ";C:\k", [EnvironmentVariableTarget]::Machine)
$env:KUBECONFIG="C:\k\config"
[Environment]::SetEnvironmentVariable("KUBECONFIG", "C:\k\config", [EnvironmentVariableTarget]::User)
30. Verify that the binaries and the config file work using the following command
kubectl config view
31. Download the Flannel setup script to your C:\k directory
[Net.ServicePointManager]::SecurityProtocol = [Net.SecurityProtocolType]::Tls12
wget https://raw.githubusercontent.com/Microsoft/SDN/master/Kubernetes/flannel/start.ps1 -o c:\k\start.ps1
32. Join the Windows node into the Kubernetes cluster.
cd c:\k
.\start.ps1 -ManagementIP <Windows Node IP> -NetworkMode <network mode> -ClusterCIDR <Cluster CIDR> -ServiceCIDR <Service CIDR> -KubeDnsServiceIP <Kube-dns Service IP> -LogDir <Log directory>
Use your VM IP as the ManagementIP, “overlay” as the NetworkMode, “10.244.0.0/16” as the ClusterCIDR assuming you used the same subnet as in this blog, 10.96.0.0/12 as the ServiceCIDR, 10.96.0.10 as the KubeDnsServiceIP and any directory as the LogDir. Please don’t use the “” when you fill in the variables.
33. At this point, you will see three PowerShell windows open for kubelet, flanneld and kube-proxy. If you go back to your Kubernetes Master (Ubuntu VM), you can see that the nodes have joined your cluster. Use the following command to verify
kubectl get nodes
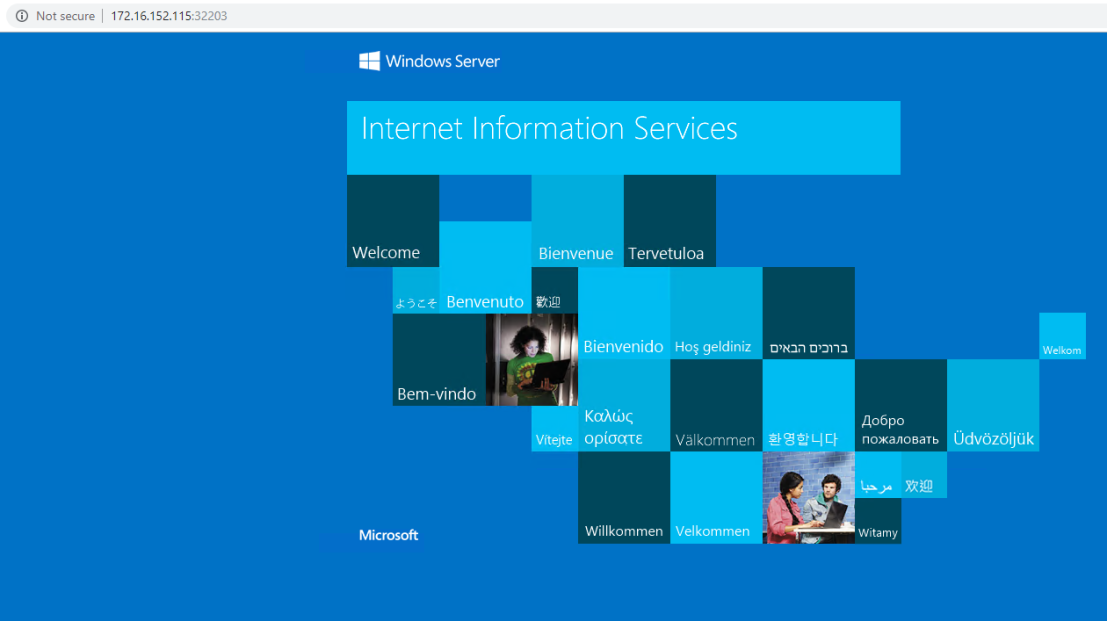
34. Now that the cluster is up and running, let’s deploy an IIS windows container on this cluster.
wget https://raw.githubusercontent.com/Microsoft/SDN/master/Kubernetes/flannel/l2bridge/manifests/simpleweb.yml -O win-webserver.yaml
kubectl apply -f win-webserver.yaml
35. You can use kubectl get svc and note the port number for the service. You can navigate to one of the http://Windows VM IP:Port Number and see the sample IIS web page. This means that your IIS container was successfully deployed.
Hopefully, you were able to follow all the steps and get your cluster up and running. Please comment below if you have any issues and we can try to resolve it.
